New Project
Create a new project.
Permission level: Developer portal access, plus the project-create permission (users without it don't see this entry at all; opening the page by its URL shows You don't have permission to create projects and returns you to My Projects)
Where it lives
Develop → My Projects → New project.
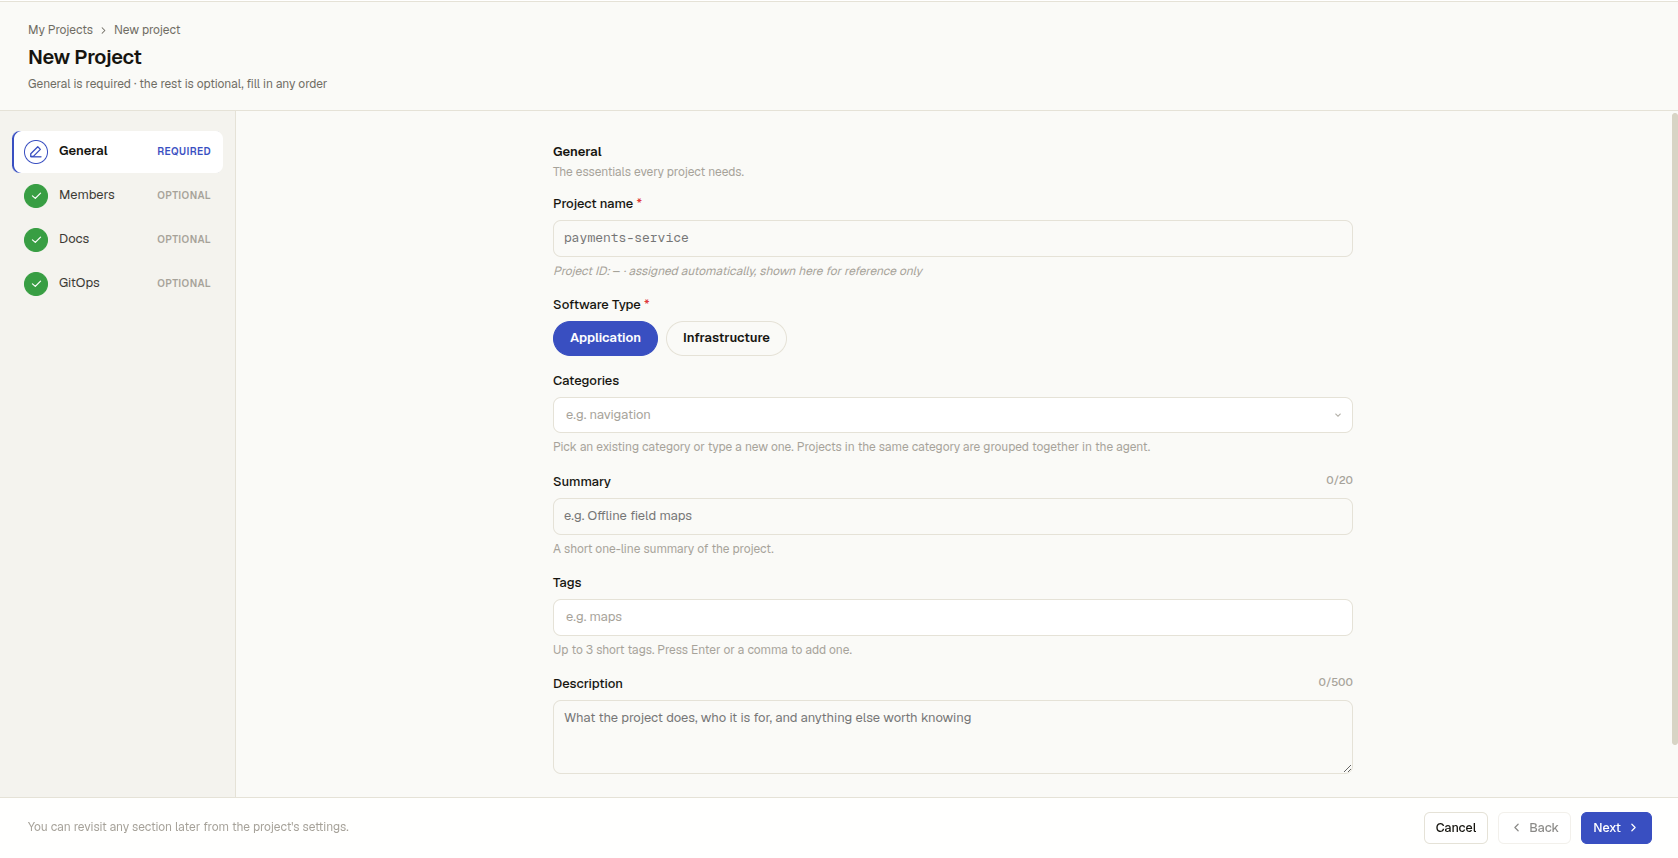
A guided wizard
New Project is a wizard with a step rail down the left. Only General is required — Members, Docs, and GitOps are optional, and you can fill them in any order or skip them entirely. Every step has Next; on the last step (GitOps) it becomes Create Project. Click a step in the rail to jump straight to it, so you can go from General to the last step and create the project without visiting the optional ones. You can revisit everything later from the project's Settings.
| Step | Required? | What it's for |
|---|---|---|
| General | Yes | The name, software type, categories, summary, tags, and description |
| Members | Optional | Give people access up front |
| Docs | Optional | Write documentation that ships with the project |
| GitOps | Optional | Sync releases from a Git repository |
General
| Field | Notes |
|---|---|
| Project name | One field that is both the project's identity and its display name. Unique across the deployment. No spaces, not only digits, no @, no length limit. Saved exactly as typed — not lowercased or hyphenated for you. The Project ID shown just below it mirrors what you type and is assigned automatically — it's there for reference only, not a separate field to fill in |
| Software Type | The project type, picked as chips — see below |
| Categories | The group the agent shows the project under (its distribution label). Pick an existing category from the dropdown or type a new one — see below |
| Summary | A short one-line summary of the project, for example Offline field maps. Up to 20 characters — the same limit as a single tag. Optional |
| Tags | Up to three short tags — see below. Shown under the project name |
| Description | A longer description of the project, max 500 characters |
Software Type
The software type is chosen from chips. By default the wizard offers the two you reach for most:
- Application — a standalone installable app with its own UI, the thing an end user or a technician actually opens (selected by default)
- Infrastructure — a background service, agent, or daemon with no UI of its own
Categories
Projects in the same category are grouped together in the agent. Open the dropdown to see the categories that already exist, and type to filter them; pick one to join that group. To create a new category, just type its name. The dropdown shows Create “name”, and the category is created when the project is saved. Categories are optional.
Only categories the project can use are suggested. A category can be tied to user apps or technician apps; a new Application project is a user app, so categories tied to technician apps are not offered. Categories with no such tie, and every category you create here, fit any project.
In the API and the layout override this field is label (the distribution label).
Tags
Type a tag and press Enter or a comma to add it; it appears as a chip below the field. Click a chip's ×, or press Backspace in the empty field, to remove the last one.
- At most three tags per project.
- Each tag is up to 20 characters of lowercase letters, digits, and hyphens, for example
mapsorfield-ops. What you type is lowercased and spaces become hyphens; anything else, such as_or@, is refused.
Members
Give individual people access to the project up front, instead of inviting them afterwards. This step needs the update-project role — if you don't have it the step is greyed out and skipped, and you can still create the project.
Add people by email and assign a role — Owner, Admin, or Member. A debounced search against the user directory helps you find people, but a typed email is valid even with no match. The people you add are staged here and invited the moment the project is created.
Docs
Write documentation that lives with the project. Add one or more docs, each a title and a Markdown body. Like members, docs are staged here and created once the project exists. A doc left with neither a title nor a body is skipped; one with a body but no title is saved as Untitled doc.
GitOps
Connect the project to a Git repository so its releases sync from the repo instead of being authored by hand. Leave the clone URL empty to skip GitOps entirely.
| Field | What it does |
|---|---|
| Git clone URL | The HTTPS or SSH repository URL. Nothing else here matters until this is set |
| Branch | Which branch to track — defaults to the repository's default branch |
| Clone interval (min) | How often (in minutes) to poll the repo — defaults to 60 |
| HTTPS username / password | Credentials for a private repository |
| .getapp file path | Path within the repo to the .getapp manifest GitOps reads |
After creating
Create Project is on the last step; reach it with Next or by clicking it in the rail. On success you land on the new project's Releases tab, ready to publish its first release.
If a General field is invalid when you click Create Project, the wizard jumps back to General to show the error. If the name is already taken, the Project name field shows That name is already in use — project names must be unique.
Members and docs are applied as a best-effort follow-up: if one can't be saved, the project is still created and you get a warning rather than a failure — add the missing member or doc later from Project Detail.
Customizing the form
The fields, their order, and which software types appear as chips are driven by a per-deployment layout. An administrator can tailor the create-project form for an environment — relabel fields, reorder them, or re-add the other software types (such as Library or Config map) — without changing the application. This is an optional deployment-level override; out of the box you get the form described above.
Required or optional fields
Only Project name and Software Type are always required. Every other field is optional by default, and the layout can make it required (or optional again) per environment:
| Step | Fields that can be switched |
|---|---|
| General | Categories, Summary, Tags, Description |
| GitOps | Git clone URL, Branch, Clone interval, HTTPS username, HTTPS password, .getapp file path |
A required field is marked with * and the project can't be created until it is filled. The same rule applies on the project's Settings tab, so a required field can't be emptied there later.
The override is the file public/config/project-form.layout.json in the GetApp Platform
deployment. It is a sparse patch matched by field key, for example:
{
  "version": 1,
  "fields": [
    { "key": "tagline", "required": true },
    { "key": "description", "required": true },
    { "key": "gitCloneUrl", "required": true }
  ]
}
The field keys are tagline (Summary), tags, description, label, gitCloneUrl,
gitBranch, gitCloneInterval, gitHttpsUsername, gitHttpsPassword, and
gitGetappFilePath. A field can't be both required and hidden.
The 20-character limit on Summary comes from the server setting PROJECT_TAG_MAX_LENGTH,
which also limits each tag. The layout can lower the limit with maxLength but can't raise it
above the server's value.