Managing Policies
This guide provides step-by-step instructions for creating, viewing, editing, and deleting policies using the GetApp Dashboard.
Prerequisites
Before managing policies, ensure you have:
- Access to the GetApp Dashboard
- Appropriate user permissions (Policy management roles)
- At least one project with releases
Accessing Policy Management
Policies and restrictions are managed together on the same page.
Navigation Path
- Log in to the GetApp Dashboard
- Navigate to Rules in the main menu
- Both policies and restrictions are displayed in the same list
Note: The Rules page displays both policies and restrictions together.
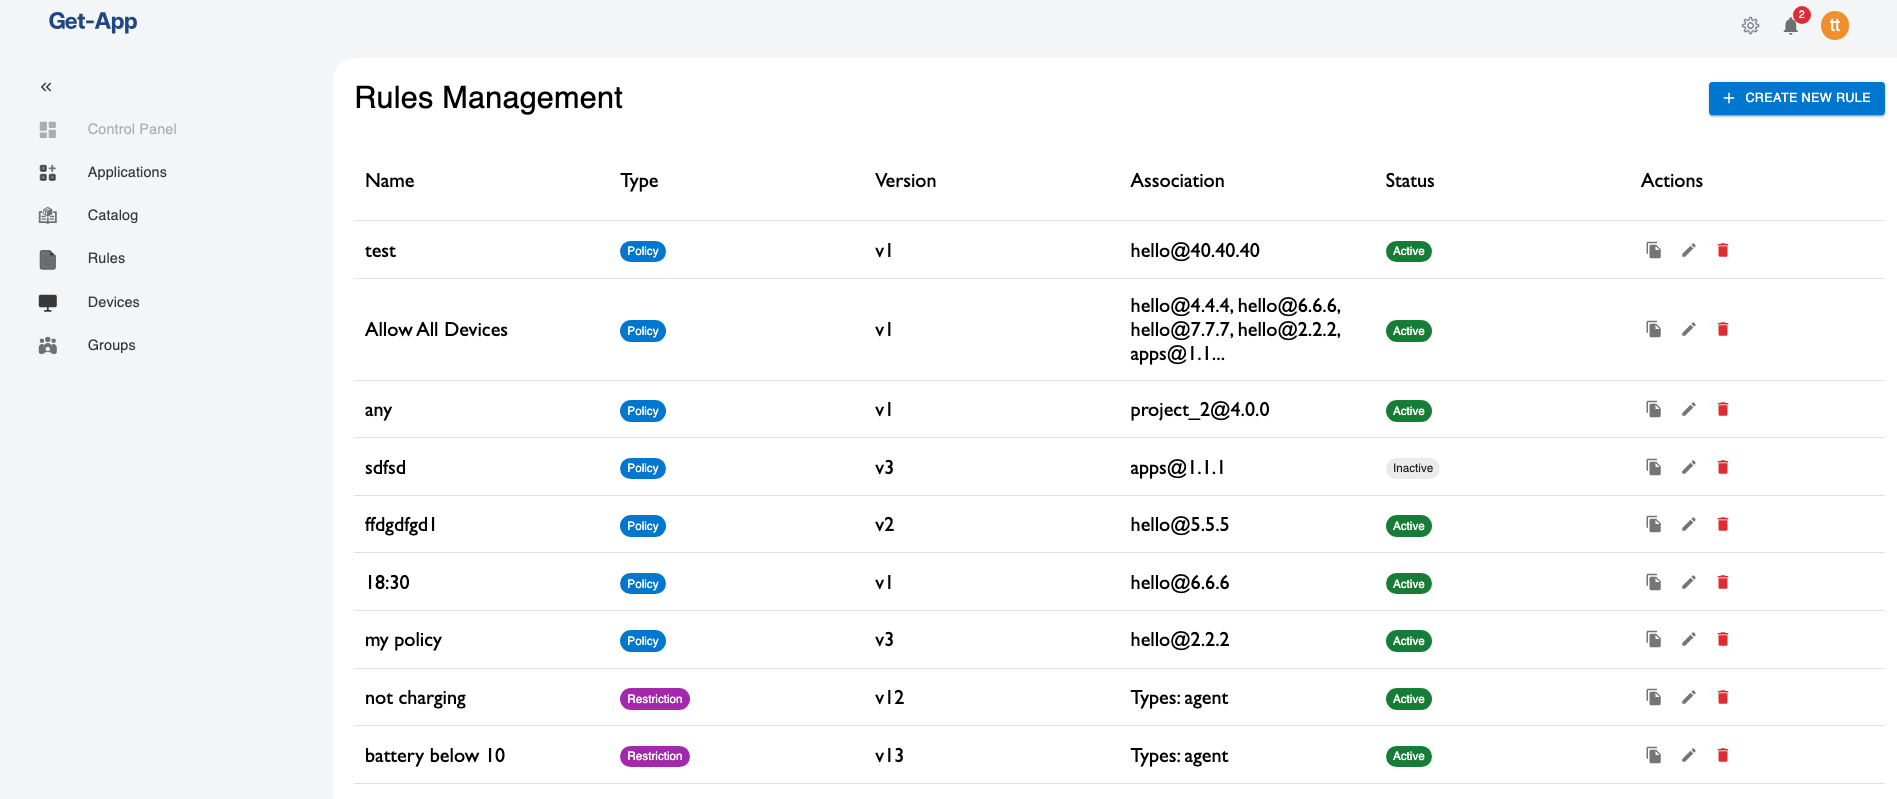
Viewing Policies
Policies List View
The policies list displays all policies associated with releases in your projects.
Information Displayed:
- Name: Policy identifier
- Type: "Policy"
- Version: Current version number
- Association: Which releases the policy applies to
- Status: Active or Inactive
- Actions: Edit, Delete, Duplicate, View buttons
Viewing Policy Details
To view detailed information about a policy:
- Click on the policy name in the list
- A details panel opens showing:
- Full policy name
- Description
- Type (Policy)
- Version number
- Creation date
- Last modified date
- Active/Inactive status
- Associated releases (project name and version)
- Complete rule definition
Understanding the Rule Display
The rule is displayed in a structured format:
- Simple rules: Show field, operator, and value
- Complex rules: Show nested conditions with AND/OR operators
- Visual indicators: Different colors for operators and values
Creating a New Policy
Opening the Create Dialog
- Navigate to the Rules page
- Click the Create or Add Rule button
- A popup dialog opens with a 3-step wizard
Step 1: Basic Information
In the first step, configure the basic policy details:
Name (Required):
- Enter a descriptive name
- Must be unique within your policies
- Examples: "Production Servers Only", "US Region Rollout"
Description (Optional):
- Add a detailed explanation
- Explain why this policy exists
- Document any special considerations
Type (Required):
- Select Policy from the dropdown
- (Restriction is the other option)
Status (Required):
- Active: Policy takes effect immediately upon creation
- Inactive: Policy is created but not enforced (for testing or future use)
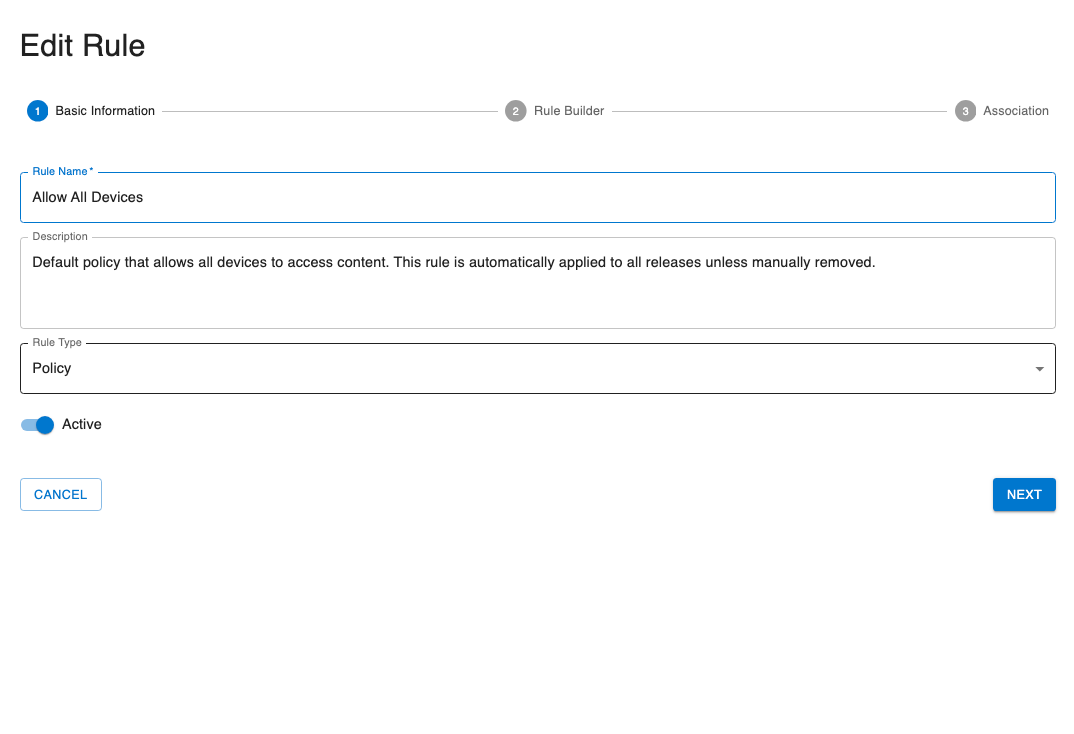
Click Next to proceed to step 2.
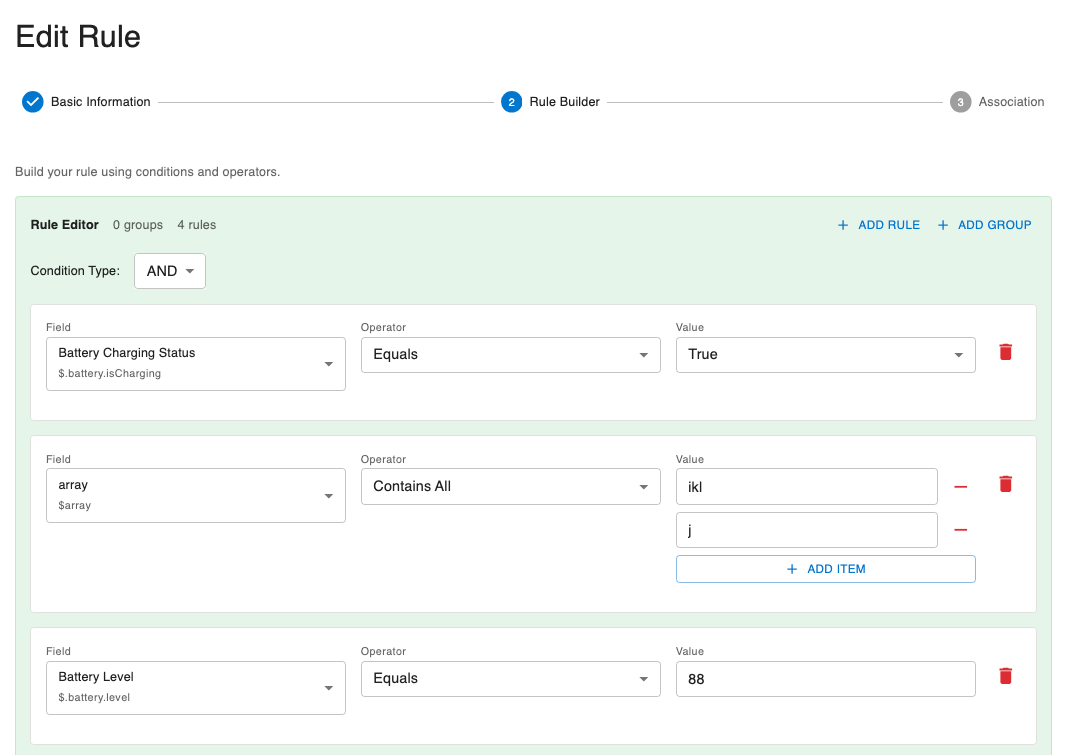
Step 2: Build the Rule
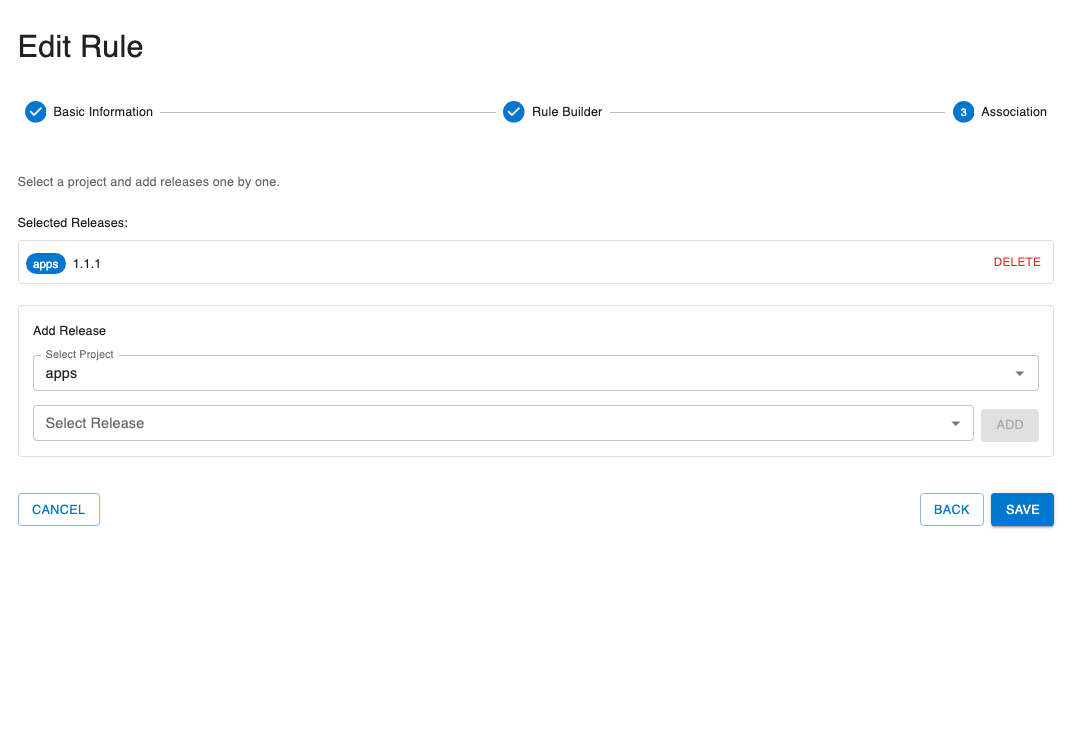
In the third and final step, select which releases this policy should apply to.
Single Release Association:
- Click Add Release
- Select Project Name from dropdown
- Select Version from dropdown
- Click Add
Multiple Release Association:
- Repeat the above steps for each release
- The policy will apply to all selected releases
- All listed releases will be subject to this policy's rules
Remove Association:
- Click the DELETE button next to a release to remove it
Review and Save
In the second step, create the rule expression that defines when this policy matches.
The rule builder provides:
- Visual Rule Builder: A graphical interface for building rules
- JSON Preview: Real-time JSON representation of your rule
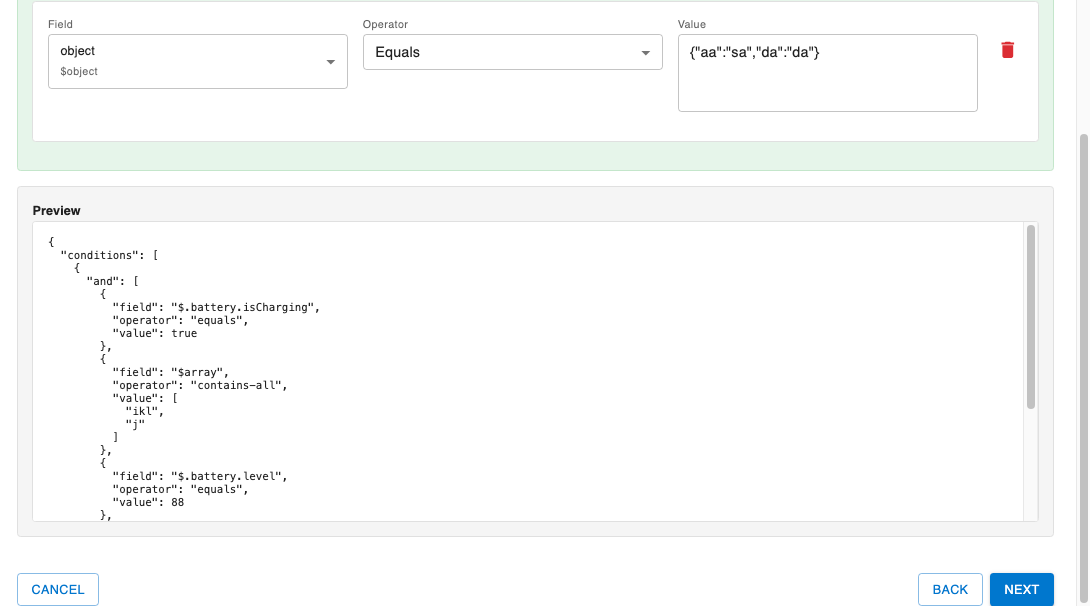
Simple Rule
For a simple field comparison:
- Select Simple Rule option
- Choose a Field from the dropdown (e.g., "deviceType")
- Choose an Operator (e.g., "equals")
- Enter the Value (e.g., "ServerDevice")
- See the JSON preview update automatically
Complex Rule with AND
To require multiple conditions:
- Select Complex Rule option
- Choose AND operator
- Click Add Condition
- For each condition:
- Select field
- Select operator
- Enter value
- Add more conditions as needed
Example: Device type is "ServerDevice" AND environment is "production"
Complex Rule with OR
To match any of multiple conditions:
- Select Complex Rule option
- Choose OR operator
- Click Add Condition
- For each condition:
- Select field
- Select operator
- Enter value
- Add more conditions as needed
Example: Region is "us-east" OR region is "us-west"
Nested Conditions
For advanced logic combining AND and OR:
- Start with an outer operator (AND or OR)
- Add conditions
- For nested logic, click Add Group
- Within the group, select operator (AND or OR)
- Add conditions to the nested group
- Nest multiple levels as needed
Example: Device type is "ServerDevice" AND (environment is "staging" OR environment is "production")
Click Next to proceed to step 3.
Step 3: Associate with Releases
- Review all entered information across all three steps
- You can navigate back to any step to make changes
- Preview the rule JSON one final time
- Click Save
- The popup closes and the new policy appears in the list
Common Creation Errors
Error: "Policy name already exists"
- Solution: Choose a unique name
Error: "No releases selected"
- Solution: Associate at least one release
Error: "Invalid rule expression"
- Solution: Check that all fields, operators, and values are properly filled in
Error: "Insufficient permissions"
- Solution: Contact your administrator for policy creation permissions
Editing an Existing Policy
Step 1: Open Edit Dialog
- Locate the policy in the policies list
- Click the Edit button (pencil icon)
- The Edit Policy dialog opens with current values populated
Step 2: Modify Policy Details
You can modify:
- Name: Change the policy name
- Description: Update the description
- Release Associations: Add or remove releases
- Rule Expression: Modify the rule logic
- Status: Activate or deactivate
Note: Changing the rule expression or associations will increment the version number automatically.
Step 3: Update the Rule
To modify the rule:
Simple Changes:
- Update field, operator, or value
- Changes are previewed in real-time
Add Conditions:
- Click Add Condition to add more criteria
- Select the field, operator, and value
Remove Conditions:
- Click the Trash button next to a condition
Change Logic:
- Switch between AND/OR operators
- Reorganize nested groups
Step 4: Save Changes
- Review all modifications
- Click Update Policy or Save
- Version number increments automatically (if rule or association changed)
- Confirmation message appears
- Changes take effect immediately (if policy is active)
Activating and Deactivating Policies
Activate a Policy
To make an inactive policy active:
Method 1: From Details View
- Click on the policy name to open details
- Toggle the Status switch to Active
- Confirm the action
- Policy immediately begins affecting release offerings
Method 2: From Edit Dialog
- Click Edit on the policy
- Check the Active checkbox
- Click Save
Deactivate a Policy
To temporarily suspend a policy without deleting it:
Method 1: From Details View
- Click on the policy name
- Toggle the Status switch to Inactive
- Confirm the action
- Policy stops affecting release offerings immediately
Method 2: From Edit Dialog
- Click Edit on the policy
- Uncheck the Active checkbox
- Click Save
When to Deactivate:
- Testing other policies
- Temporarily suspending a policy
- Troubleshooting issues
- Maintenance windows
Duplicating a Policy
Duplicating creates a copy of an existing policy, which is useful for creating similar policies.
Step 1: Duplicate
- Locate the policy to duplicate
- Click the Duplicate button (copy icon)
- A new policy is created with:
- Name: "Copy of [Original Name]"
- Same rule expression
- Same associations
- Status: Inactive (by default)
- Version: 1 (new policy)
Step 2: Modify the Copy
- Edit the duplicated policy
- Change the name
- Modify the rule or associations as needed
- Activate when ready
Deleting a Policy
Warning: Deleting a policy is permanent and cannot be undone. The policy will no longer filter releases.
Step 1: Delete
- Locate the policy to delete
- Click the Delete button (trash icon)
- A confirmation dialog appears
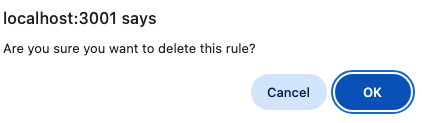
Step 2: Confirm Deletion
- Review the warning message
- Confirm you want to delete the policy
- Optionally, enter the policy name for additional confirmation
- Click on Ok
- Policy is permanently removed
After Deletion
- Associated releases are no longer filtered by this policy
- If a release has no other policies, it becomes unavailable to all devices
Alternative to Deletion
Instead of deleting, consider:
- Deactivating: Temporarily suspend without removing
- Documenting: Add notes about why it's no longer needed
Testing Policies
Before activating a policy, test it to ensure it works as expected.
Test Rule Evaluation
GetApp supports live rule evaluation directly from the rule builder. You can test your policy rule against all registered devices before saving or activating it.
See Evaluating Rules for a full walkthrough.
Test on Non-Production Devices
- Create the policy but keep it Inactive
- Review the rule logic carefully
- Activate the policy
- Monitor discovery on test devices
- Verify the expected releases are offered or filtered
- Deactivate if issues are found
- Fix and re-test
Monitor Logs
After activating a policy:
- Check server logs for policy evaluations
- Monitor which devices match the policy
- Verify expected behavior
- Watch for unexpected filtering
Viewing Policy History
Policy version history helps track changes over time.
Version Number
Each policy displays its current version number. The version increments when:
- The rule expression is modified
- The associations change
Policy Management Best Practices
Naming Conventions
Use clear, consistent naming:
- Good: "Production-Servers-Only", "US-East-Region-Rollout"
- Avoid: "Policy1", "test", "tmp"
Documentation
Always add descriptions:
- Explain the purpose
- Document the business reason
- Note any dependencies or related policies
- Include contact information for questions
Start Inactive
When creating new policies:
- Create with Inactive status
- Review and test thoroughly
- Activate when confident
Regular Reviews
Periodically review your policies:
- Remove obsolete policies
- Update outdated criteria
- Consolidate overlapping policies
- Document changes
Testing Workflow
- Create policy (inactive)
- Review rule logic
- Test on development devices
- Activate for staging
- Monitor results
- Roll out to production
- Continue monitoring
Version Control
Track policy versions:
- Note why changes were made
- Keep records of major updates
- Document the impact of changes
Troubleshooting
Policy Not Taking Effect
Problem: Created/updated policy but devices still receive unexpected releases.
Solutions:
- Verify policy is Active
- Check that associations include the correct releases
- Verify rule logic matches device properties
- Ensure devices have the expected field values
- Clear any caches on the server
- Trigger a new discovery from test devices
- Check server logs for evaluation errors
Can't Create Policy
Problem: Create button doesn't work or error when saving.
Solutions:
- Check user permissions
- Verify all required fields are filled
- Check rule syntax is valid
- Ensure at least one release is associated
- Try a different browser if UI issues persist
Policy Conflicts
Problem: Multiple policies on same release causing unexpected behavior.
Solutions:
- List all policies for the release
- Understand that ALL policies must match (AND logic)
- Review each policy's rule
- Consider consolidating policies
- Test the combined effect
Rule Not Matching
Problem: Policy rule doesn't match expected devices.
Solutions:
- Use the test evaluation feature
- Check device field values
- Verify operator usage (equals vs contains, etc.)
- Review case sensitivity
- Check for typos in values
- Test with simplified rule first
Next Steps
- Learn about Managing Restrictions
- Understand Rule Fields and Expressions